Battery switch on travel trailer function is crucial for managing your RV’s power. Understanding how to use and maintain this system is key to avoiding electrical problems and ensuring a smooth camping experience. This guide will walk you through the different types of switches, common issues, safety precautions, and best practices for maximizing your travel trailer’s power. We’ll cover everything from basic operation to advanced troubleshooting, making sure you’re comfortable with this essential RV component.
From simple on/off switches to more sophisticated setups with multiple battery banks, we’ll explore the intricacies of how these switches work and their impact on your overall power management. We’ll also delve into the various battery types compatible with your travel trailer and how their charging characteristics affect the switch’s operation. Get ready to become a power management pro!
Understanding Battery Switch Functionality in Travel Trailers

Your travel trailer’s battery switch is a crucial component, managing power flow between your house batteries and the charging sources (shore power, alternator, solar). Understanding its operation is key to preventing electrical issues and maximizing your battery life. This section will break down the different types, wiring, operation, and advantages/disadvantages of common battery switch systems.
Battery Switch Types in Travel Trailers
Travel trailers typically utilize one of three main types of battery switches: a simple on/off switch, a two-battery switch, and a more sophisticated multi-stage switch. A simple on/off switch is the most basic, offering only the option to completely disconnect or connect the battery. A two-battery switch allows for the selection of either battery bank (for instance, a starting battery and a house battery), or both simultaneously.
More advanced multi-stage switches offer a combination of options, including connecting to shore power, solar, and the vehicle’s charging system independently or in various combinations.
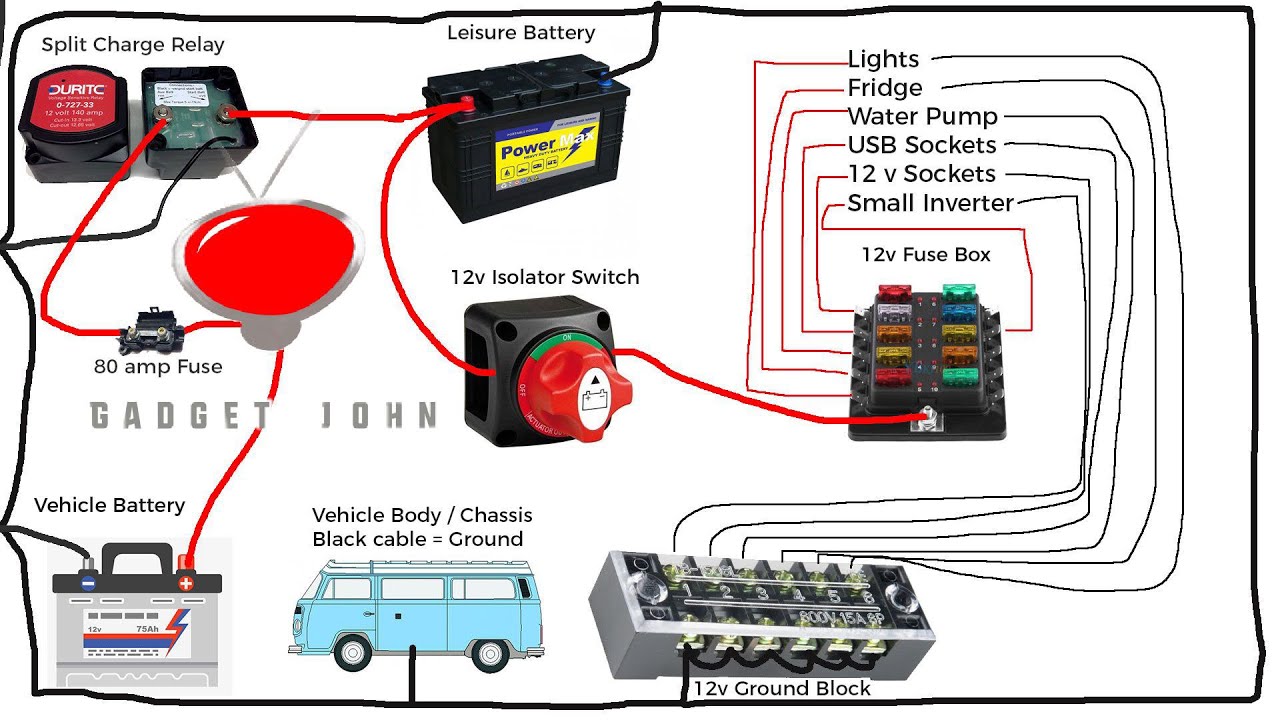
Typical Wiring Diagrams for Battery Switch Setups
A standard two-battery switch setup usually involves two batteries (starting and house) connected to a switch, which then connects to the trailer’s 12V system. The starting battery powers the vehicle’s engine, while the house battery powers the trailer’s appliances. A typical diagram would show the positive (+) cables from each battery running to the switch. The switch then has output terminals that feed power to the trailer’s 12V system.
So, you’re hitting the road in your travel trailer? Awesome! First things first: understand your power. Check out this guide on the battery switch on travel trailer function to avoid any unexpected dead batteries. Knowing how to manage your power is key, and once you’ve got that down, remember to secure your trip with solid travel insurance.
A good option is Aon travel insurance , which offers comprehensive coverage for peace of mind on the open road. Happy travels!
Negative (-) cables connect directly from each battery to the chassis (ground). More complex setups with multiple batteries or additional charging sources will have more intricate wiring, often including fuses and circuit breakers for safety. A professional electrician should be consulted for complex setups.
Operating a Battery Switch: A Step-by-Step Guide, Battery switch on travel trailer function
Before operating any battery switch, always ensure the power is off at the main breaker panel. The specific steps will depend on the type of switch. For a simple on/off switch, simply flip the switch to the “on” position to connect the battery to the trailer’s system and to the “off” position to disconnect. For a two-battery switch, carefully read the switch’s markings to understand the different positions (e.g., “Battery 1,” “Battery 2,” “Both,” “Off”).
Select the appropriate position based on your needs. For more advanced switches, consult the manufacturer’s instructions as the operation might be more complex, involving multiple switches or selectors.
Comparison of Battery Switch Types
| Switch Type | Advantages | Disadvantages | Cost |
|---|---|---|---|
| Simple On/Off | Simple, inexpensive | Limited functionality, no battery selection | Low |
| Two-Battery Switch | Allows selection of individual batteries or both, prevents cross-discharge | More complex than a simple switch | Medium |
| Multi-Stage Switch | Offers the most control, allowing independent management of multiple charging sources and batteries | Most complex and expensive | High |
Safety Considerations with Travel Trailer Battery Switches
Working with your travel trailer’s battery system requires caution. Improper handling can lead to serious injury from electric shock, burns, or even explosions from leaking battery gases. Understanding the risks and following safety procedures is crucial for protecting yourself and your equipment.Battery switches, while seemingly simple, are critical components in managing your trailer’s power. Incorrect operation can result in unintended power flows, short circuits, and potentially damage to your appliances or even a fire.
So, you’re prepping for your awesome travel trailer adventure? First things first: understand your power! Check out this guide on the battery switch on travel trailer function to avoid any dead-battery surprises. Knowing how to manage your trailer’s power is crucial, and once you’ve got that sorted, think about travel insurance. Securing Aon travel insurance provides peace of mind, covering unexpected issues and letting you focus on enjoying the trip itself.
Happy travels!
Always treat the battery system with respect and follow the instructions carefully.
Safe Battery Switch Disconnection and Reconnection
Before disconnecting or reconnecting the battery switch, always ensure the main power source to the trailer is turned off. This usually involves disconnecting the shore power cord. Next, verify that all appliances and electronics inside the trailer are turned off. This prevents any unexpected surges or power issues when working with the switch. Wear safety glasses to protect your eyes from potential sparks or battery acid splashes.
Use insulated tools to avoid accidental shocks. When disconnecting, firmly but gently turn the switch to the “off” position. When reconnecting, do so with the same care, ensuring the switch is securely in the “on” position.
Safety Tips for Battery Switch Maintenance and Use
It’s vital to establish and maintain safe practices when handling your travel trailer’s battery switch. Neglecting these precautions can lead to accidents and damage. Regular inspection and proper handling are key to a safe and efficient battery system.
- Always wear appropriate safety gear, including safety glasses and gloves, when working near batteries or the battery switch.
- Inspect the battery switch and its connections regularly for corrosion, loose wires, or damage. Clean any corrosion with a wire brush and baking soda solution.
- Never work on the battery system in a confined space without adequate ventilation. Battery gases are explosive.
- Keep the battery area clean and free of debris to prevent accidental shorts or fires.
- If you smell gas near the batteries, immediately move to a well-ventilated area and investigate the source. Do not attempt to operate the battery switch if you detect a gas leak.
- Consult a qualified technician if you are unsure about any aspect of your battery system or its operation. Don’t hesitate to seek professional help when needed.
- Ensure children and pets are kept away from the battery area at all times.
Battery Switch Installation and Replacement: Battery Switch On Travel Trailer Function
Installing or replacing a battery switch in your travel trailer is a moderately challenging DIY project. Properly connecting the switch ensures safe and reliable power management for your trailer’s electrical systems. Incorrect installation can lead to electrical shorts, battery damage, or even fire hazards. Always disconnect the battery’s negative terminal before starting any electrical work.Replacing a battery switch involves disconnecting the existing switch, installing the new one in the same location, and reconnecting the wires.
Installing a new switch might require drilling new holes or modifying existing ones to accommodate the new switch’s dimensions. Understanding your trailer’s wiring diagram is crucial for a successful installation.
Battery Switch Replacement Procedure
Replacing an existing battery switch is generally straightforward. First, disconnect the negative terminal of your trailer battery. Then, carefully trace all wires connected to the old switch, noting their position and function. Take photos if helpful. Use a wire stripper/cutter to carefully disconnect each wire.
Next, remove the old switch from its mounting location. This might involve unscrewing it or releasing clips. Carefully install the new switch, ensuring it is securely mounted. Finally, reconnect the wires, making sure each wire goes to its correct terminal on the new switch. Double-check your work before reconnecting the battery’s negative terminal.
Battery Switch Installation Procedure
Installing a new battery switch involves a few more steps than replacement. Begin by choosing a suitable location for the switch, considering accessibility and protection from the elements. You’ll need to drill mounting holes if necessary. Before drilling, make sure you’re not damaging any existing wiring or structural components of your trailer. Next, run the necessary wiring from the battery to the switch’s location.
Use appropriately sized wiring and secure it with cable ties to prevent damage. Mount the switch securely, and then connect the wires according to the wiring diagram for your specific switch and trailer setup. Again, double-check your connections before reconnecting the battery.
Proper Wiring Techniques for Battery Switches
Correct wiring is paramount for safety and functionality. Use appropriately sized wires for the amperage your system requires. Never use undersized wire, as this can lead to overheating and potential fires. Use wire connectors that are properly sized and rated for the amperage. Ensure all connections are tight and secure to prevent corrosion and loose connections.
Always use insulated wire connectors to prevent short circuits. Before connecting the battery, test your connections with a multimeter to ensure proper continuity and voltage. Use color-coded wires if possible to make identification easier. Consult your trailer’s wiring diagram for specific wiring configurations.
Internal Components of a Typical Battery Switch
A typical battery switch usually consists of a housing, several terminals for wire connections, and an internal switching mechanism. The housing protects the internal components from damage and the elements. The terminals, often color-coded, provide connection points for the battery, the trailer’s electrical system, and possibly an auxiliary battery. The switching mechanism, usually a rotary switch or a toggle switch, allows you to select which battery or combination of batteries are connected to the trailer’s electrical system.
A common configuration includes a main battery position, an auxiliary battery position, and an off position. Some switches also include a “both” position, connecting both batteries in parallel. The switch’s internal mechanism uses contacts that make and break the electrical connections, allowing you to control the power flow.
Mastering your travel trailer’s battery switch is essential for a safe and enjoyable RV experience. By understanding its function, troubleshooting potential problems, and following safety guidelines, you can confidently manage your power, avoid costly repairs, and keep your adventures running smoothly. Remember, proper maintenance and safe operation are key to extending the life of your battery switch and ensuring reliable power whenever you hit the road.
So, get out there and enjoy the open road!
Questions and Answers
What happens if I accidentally leave my battery switch on?
Leaving your battery switch in the “on” position for extended periods while your trailer isn’t connected to shore power will drain your house batteries. This can lead to a dead battery and prevent you from using your appliances.
How often should I check my battery switch?
Regularly inspect your battery switch for corrosion, loose connections, and any signs of damage. A visual check every few months, or before each trip, is recommended.
Can I use different types of batteries with the same battery switch?
While many switches work with various battery types, it’s crucial to check your switch’s specifications and ensure compatibility with your chosen batteries (e.g., lead-acid vs. lithium). Incorrect pairings can damage your system.
My battery switch is making a clicking sound. What’s wrong?
A clicking sound often indicates a low battery voltage or a problem with the switch itself. Check your battery voltage and inspect the switch for loose connections or internal damage. If the problem persists, consult a professional.
